This is just a 2 frame animation. You just have the lights on one of the frames the darker color, and the brighter or lighter colored lights on the other frame. To do that, just get up whatever graphic you are using and duplicate it by clicking on "Window / Duplicate" and get rid of the original in PSP. You want to keep the original untouched.
Now duplicate it again, since it's 2 frames.
It's important to duplicate and not copy and paste. You need both frames the exact size and copy and paste doesn't always guarantee that, but duplicating does.
Now say you are going to work with a still frame of some lights that you want to blink.
You can do over both frames so one is a darker color, and one is a brighter or lighter color, or just do one of them over because you are satisfied with the original ones color.
So the original will be your first frame, so now do over the second. Make sure your magic wand is set a zero feather and around 15 for tolerance.
Now just click in one of the bulbs and then click on "Selections / Modify / Expand and choose number 1.
Doing this brings it closer to the edges.
Now if you want it in the same color family, but just brighter, click on the flood fill icon, then click on the dropper icon.
Bring the dropper to the bulb and left click in it so that the color of the bulb shows up in the top style box (foreground color).
Now click in the foreground color box once and the color choices will appear.
If this box doesn't appear >> 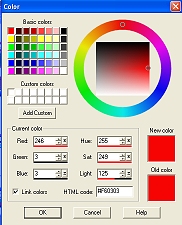 , then get rid of the box that does appear and click on "Colors / Increase Color Depth / 16 Million Colors".
Now click in the foreground color box once again and the above box should appear.
Now you want a brighter color in the same color family as the bulb, so just click in the box that is inside of that circle to find a brighter color. You will see a preview in the "New Color".
So now flood fill the bulb with the new color.
Do the same with the remaining bulbs.
Now there are 2 ways to save these frames so you can bring them to Animation Shop and save it as an animation.
One way is to copy the second frame and "Paste As New Layer" into the first frame.
Then save it as a psp file by clicking on "File / Save As".
Make sure PSP is in the "Save as type" area.
The second way is to save each frame individually.
Now open Animation Shop.
Click on the Animation Wizard Icon.
At the first box, make sure that "Same size as the first image frame" is chosen.
Click Next.
At the next box, choose transparent if there is no deep drop shadow or you used a deep gradient glow with Eyecandy.
If there is, it's best to choose opaque because deep drop shadows and deep gradient glows look funny on transparents backgrounds.
Click Next.
Choose "Upper Left Corner of the frame" and "With the canvas color". Do NOT choose 'scale frames to fit'.
Click Next.
Choose "Yes, repeat the animation indefinitely". In the case of blinking lights, choose 10 or 15 seconds.
The lower the number, the faster the animation.
Click Next.
Now click the "Add Image" button.
Navigate to the folder the graphic(s) you just worked on is in, and double click on it to open it.
If you saved it as one psp file, open that.
If you saved the individual frames, open them by clicking on the second frame first. That will make it in order in the box.
If it's out of order, click on the move up and down buttons.
Click Next, then Finish. Maximize your frames.
Click on the "View Animation" icon. After you view it, get rid of that window to get back to the frames.
If you like it, save it!
Crop the animation if need be to get rid of any extra background. Click on the crop icon and as you crop the first frame, all frames get cropped with it. Click in the middle of it to finalize the crop.
Now if you want to, you can view it again.
You can either save the animation from the individual frames, or when you are viewing it as an animation.
Click on "File / Save As" (not save frame as). Save it to your folder of choice.
After you save it, some boxes will pop up.
At the first one, slide the image bar all the way to the top. For some animations that are either large or just have a lot of frames to it, you will have to have it lower to make the file size smaller, as long as the quality is still good. But since this is a small animation, you can choose the best quality. In Ani Shop, what mostly determines the file size is how many frames there are, and not the dimensions so much.
Now click on the CUSTOMIZE button.
* In the "Colors" tab, make sure number of colors is 255.
Choose "Optimized Octree", and "Error Difusion".
However, if you have a drop shadow or a gradient glow, it's best to choose "Optimized Mediun Cut".
* In the "Optimizations" tab, only have the second, third and forth ones checked.
* In the "Partial transparency" tab, choose "Convert pixels less than 1...".
And choose "Yes, blend with this color", and click in the color box to choose white.
OK the box.
You shouldn't need to change any of the settings in the customize box very often.
Click Next.
Now you will see it load.
Click Next.
There will be a mini preview.
Click Next, then Finish.
Before you get rid of the frames, put your animation in an email to see if the quality is good, if you had to choose anything lower than the best quality. I find that email is the best way to preview it.
If the quality is not good, go back to Ani Shop, and with your frames still there, click on "Edit / Undo Optimize Animation".
Then save it again as a better quality by sliding the bar higher.
Hope you found this tutorial useful! Please do not pass my tutorials around. Instead, give a link to this site.
~Summer °Ü°