This is how to get the glass block effect background in my above sigtag. These instructions are for using the plug-in filter "Eye candy 4000". Eye Candy 3000 also has a glass effect feature, but I don't think the controls there are as good as 4000, but you can play with it to get the effect you want. In any case, Eye Candy 3000 is now free. Here's a link to download it...
That site is hard to read, so you will have to highlight the page to read it. If that link ever become inactive, just go to google.com to do a search for Eye Candy 3000.
But this tut is for Eye Candy 400...specifically.
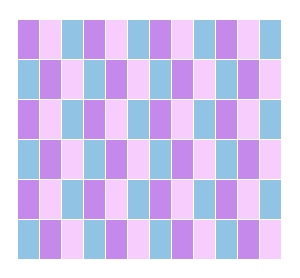
1) Save the grid of colored boxes below.
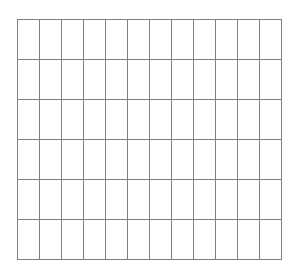
2) Or save the blank grid and fill with your own colors. Make a duplicate of it first (Window / Duplicate) and work with the duplicate of it so the original is left intact.
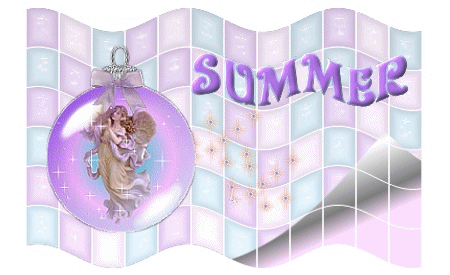
3) However, it's easier to just save the colored one and use the color replacer tool to change the colors if you want to. I have inst. at this site on how to use the color replacer tool. It's in my "PSP Instructions" section. Below is another sig tag I created using the color replacer tool on the blocks.
4) So once you get the color of the blocks you want, change the size of it if need be, and then click on "Effects / Sharpen / Sharpen" if the blocks appear blurry after changing it's size.
Now make the blocks a layer by clicking on "Layers / Promote to Layer".
Now delete the white backgound. My psp inst. for beginners page has inst. for how to do that if you don't know.
5) Now click on "Effects / Plug-In Filters / Eye Candy 4000 / Glass"
6) Click on "Settings", and choose "Rough Cut".
7) At the BASIC tab, choose these settings below.
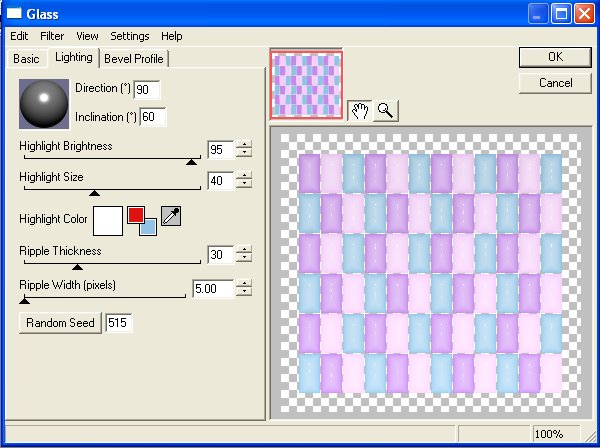
8) At the LIGHTING tab, use these settings.
9) At the BEVEL PROFILE tab, choose "Button"
10) OK the box.
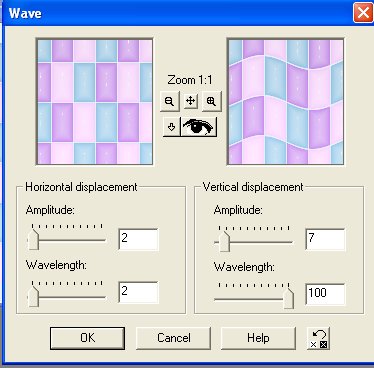
11) Now click on "Effects / Geometric Effects / Wave" and use these settings, then OK the box.
12) Now click on "Effects / Plug-In Filters / Eye Candy 4000 / Glass" again, and use the same settings as before. Except at the BASIC tab, you can change the opacity to darken or lighten it to your taste.
13) Click OK.
14) Now click on "Effects / Geometric Effects / Page Curl" and use these settings below. Click on the color in the top box and type in the color number shown, then OK the box.
15) That's it! Now just add your name to it. I also applied a wave effect to my name, plus an inner bevel. Also, add a graphic or an animation to it. If I don't already have a tut on adding already made animations to things such as this, then I will in the future. Look for that tut in the "Ani Shop Tuts" section.
Hope you found this tutorial useful! Please do not pass my tutorials around. Instead, give a link to this site.
~Summer °Ü°